Shadywood Quilts
Professional Machine Quilting
Quilt Preparation
The better care that you take preparing the quilt top, the better the finished result will be. Press the quilt top well from the back and make sure that all the seams are pressed. Clip threads, especially dark ones that may 'shadow' behind lighter colored fabrics. If you are in doubt, hold the top up to the light. Can you see dark threads?
The quilt top and the backing should lay flat, be 'squared up' at the corners and straight on all sides. (note: a peice of typing paper is a perfect 90 degree angle)
Do not baste or pin the quilt layers together. This is not necessary for long arm machine quilting, as each layer is loaded separately onto the rollers. If you have already done this, please remove the basting
Indicate the top and bottom of the quilt clearly if there is a difference. Sometimes it might not be obvious to us that the top (or backing) is directional.
Press the quilt top well from the back and make sure that all the seams are pressed. Clip threads, especially dark ones that may 'shadow' behind lighter colored fabrics. If you are in doubt, hold the top up to the light. Can you see dark threads?
The quilt top and the backing should lay flat, be 'squared up' at the corners and straight on all sides. (note: a peice of typing paper is a perfect 90 degree angle)
Do not baste or pin the quilt layers together. This is not necessary for long arm machine quilting, as each layer is loaded separately onto the rollers.
Indicate the top and bottom of the quilt clearly if there is a difference. Sometimes it might not be obvious to us that the top is directional.
Fold the quilt top carefully.
- Mark the top of quilt, with a note held by a safety pin, do the same with your backing if it is a directional fabric.
- Top should be clean, pressed & threads clipped.
- Press the backing well, seams to one side, trim all the hanging threads.
- Quilt and backing should be squared
- Please DO NOT pin or baste layers together.
- If applicable, include fabric for binding, king size quilt 1 1/4yd. all other quilt sizes 1 yd.
- Place quilt top, and any fabrics in plastic bag to protect during shipping.
Quilt Backing
Choose backing fabric as carefully as quilt top fabric. An excellent choice is 100% cotton in a print that compliments your quilt top. You can use leftover blocks from piecing the front. Quilt shop quality flannel makes a cozy backing. The use of sheets is strongly discouraged.Quilt top, backing and batting should be 3 separate pieces. We load them separately on the longarm machine.
If you prewash your quilt top it is highly recommended that you also prewash your backing fabric.
Back stitch all seams that come to the edge. Press the seams flat. The backing should be 4" to 5" larger than the quilt top on all four sides. This means it should be 6 to 10 inches larger than the top in both directions. This is critical in order to properly load your quilt onto the longarm machine.
For example: if your quilt top measures 90" x 90", the backing and batting should measure at least 96" x 96".
Please note that if backing fabric is too small, there will be an additional charge to cover additional work or the quilt top may be returned to you unquilted.
Batting
If you are providing the batting, it also must be about 6 to 8 inches larger than the quilt top. Cut it as square as possible. We recommend better quality battings. Some are made with uneven density or are too fragile and may shred in handling. Others may beard and spoil your quilt.
 Hobbs Heirloom Premium Cotton 80/20 (80% cotton, 20% polyester) 96" wide on roll. Has more loft than typical cotton batting and gives more definition to the stitching than 100% cottons. Expect shrinkage of 3-5%, can be pre-shrunk to minimize shrinkage. A strong, long wearing quilt batting. Lightly bonded, drapes well, resists bearding and bunching.
Borders
Take your time and give extra attention to this step. You'll be much happier with the results. Otherwise your border can be a real trouble maker! The time taken to do this extra measuring and pinning will pay off with a smoother border. Borders that are not smooth can appear puckered once quilted. In extreme cases a small 'tuck' may be needed to absorb extra fullness.
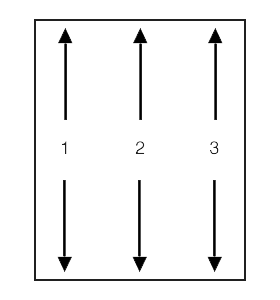
 Lay your quilt top out flat, smooth and take three measurements from top to bottom (1.) one at a few inches from the left edge, (2.) one near the middle, and (3.) one at a few inches from the right edge.
Average your measurements if necessary.
Cut 2 strips. Divide into quarters and pin onto the quilt top before sewing. Some easing may be necessary.
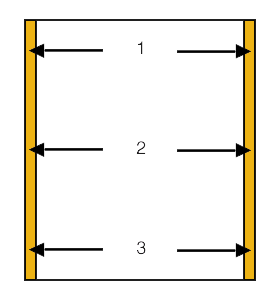
 Now you're ready to cut the remaining two borders. Take three more measurements this time from left edge to right edge
(1.) one at a few inches from the top edge
(2.) one near the middle
(3.) one at a few inches from the bottom edge
Average your measurements if necessary.
Cut 2 strips. Divide into quarters and pin onto the quilt top before sewing.
How Much Does It Cost to Quilt a Quilt Top?
There are several factors that will determine the final cost of finishing your quilt. At Shadywood Quilts pantograph quilting generally costs .02 a square inch. More dense patterns can cost a little more. The denser the pattern, the more time it takes and more thread is used. Use our Quick Quilt Cost Calculator to get general pricing. Some quilters charge EXTRA for thread. (How the heck do you quilt a quilt without thread?)
Check our Pricing Page for more details.
Use the simple cost calculator to give you an estimate of how much your quilt will cost to be finished.
Click here to use Cost Estimator.